
There are two types of custom transformers.
An embedded transformer is one whose definition is stored in the workspace itself. Each instance of the custom transformer refers to that embedded definition. Only the workspace in which the definition is embedded has access to that custom transformer.
A linked transformer is one whose definition is stored outside of the workspace, in its own file. Each instance of the custom transformer is linked to that definition. Any workspace can have access to that custom transformer.
On a workspace canvas, embedded transformers are identified by their green color, while linked transformers are colored cyan:

Both types of transformers can be used in an FME workspace, and there are various advantages and disadvantages to each type.
Embedded Transformers
Embedded transformers are easier to manage, need no external files, and their definition is embedded into the workspace. They are particularly useful for tidying a workspace but also work for employing advanced functionality like parallel processing.
However, sharing and re-use of content are not as simple with an embedded transformer. The custom transformer cannot easily be shared with other users, unless they are given a copy of the same workspace, and it is not easy to maintain a consistent definition among several users.
Linked Transformers
Linked transformers are perhaps a little harder to manage. They exist as a file (.fmx) outside of the workspace, which is less convenient, and when used to employ advanced functionality such as loops they can be more complex.
However, a linked custom transformer is a little easier to edit (you open the .fmx file rather than the .fmw file) and is much easier to share among users. Not only can the file be given to any FME author to use, but any number of authors can actually point their FME to the same custom transformer file.
Sharing the same file is useful because any changes made to the definition are automatically propagated to all workspaces that use it.
| FME Lizard says… |
| Like embedded transformers, linked transformers also show up in the transformer gallery and Quick Add dialog. Also notice that they have a special icon to signify that you are about to use a linked version, rather than the embedded: |
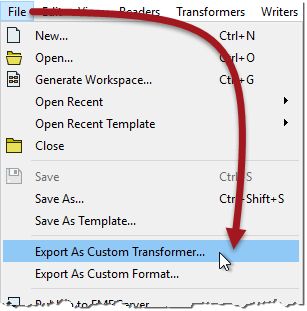
All custom transformers start out with an embedded definition. To create an external definition, the custom transformer is exported using the Export as Custom Transformer option on the menubar:
At this point a dialog opens in which you can confirm the transformer name and category, plus some other parameters including the save location:
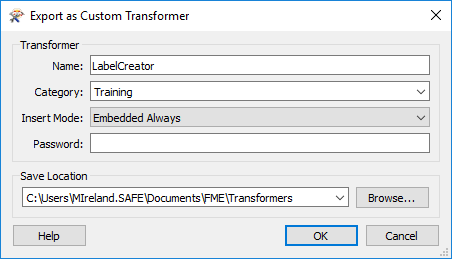
Name and category are fairly obvious, so let's look at some of the other different options...
We know that the definition of a custom transformer can be stored either in a workspace (embedded) or in a separate file (linked). Therefore each instance of a custom transformer points to either an embedded or linked definition.
But it's important to know that each instance can change their definition source. For example, an instance of a custom transformer linked to a file definition, can be switched to embedded (in which case the external definition gets embedded into the workspace).
Likewise, an instance that points to an embedded definition, can be switched to point to an external file.
When I am the author of a custom transformer I might want to control the initial state when an instance is placed for the first time. This is what the Insert Mode parameter does.
There are four different modes:
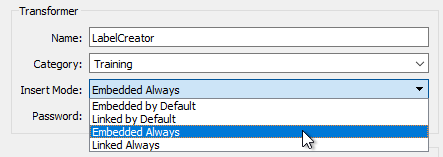
Let's say I export my custom transformer with Insert Mode set to one of the Embedded choices. The definition is now stored inside an fmx file and FME will recognize it as an available transformer. But when a user places a new instance to their workspace (say with Quick Add or the Transformer Gallery), the definition of the custom transformer is copied from the fmx file and embedded into the workspace.
If I choose Embedded By Default, it means that although each instance of the transformer starts as Embedded, the user can switch the instance to "Linked" at any point.
If I choose Embedded Always it means that each instance of the transformer starts as embedded, and must stay that way. It cannot be switched to Linked at a later point.
Similarly, I could export my custom transformer in Linked mode. When a user places a new instance the definition of the transformer remains in my fmx file, with the instance linked to it.
If I choose Linked By Default, each instance of the transformer starts as Linked, but can be switched to Embedded at any time.
If I choose Linked Always, each instance starts as Linked, and stays that way. To cannot be switched to Embedded at a later point.
| FME Lizard says… |
| Insert Mode is an important parameter when I am the author of a custom transformer, who has created it for other workspace authors to use. It gives me control over how they will use that transformer. |
Embedded Always is a good choice when the person using the transformer is less experienced with FME; it's easier for them to manage and if they make changes they won't affect other people. Embedded is also a good choice where the custom transformer is intended for use by individuals (i.e. not sharing it as a group).
Linked Always is a good choice when the custom transformer is intended to be shared among a group of users. Because it is linked, the users will always receive updates if the transformer definition is changed, and because the definition is shared, it becomes a standard that is applied to all users.
Only when the end-user is experienced in FME and can understand the consequences, is it advisable to use a “By Default” setting and allow type switching.
The password field allows you to password-protect the custom transformer. This makes it impervious to edits from unauthorized persons. Additionally, the file contents are (very mildly) encrypted so that they cannot be copied by opening the source file in a text editor.
This allows authors to make transformers available for purchase without any fear that their work will be copied or edited. Of course, it’s important not to forget or lose the password yourself, in case you wish to make edits!
FME has a specific installation folder in which custom transformer files can be saved. If a custom transformer is saved in this folder, then it becomes available in Workbench and can be used the same as any other transformer. If it is saved elsewhere then FME won't be able to find it unless that path is set under Tools > FME Options > Default Paths.
When you click the OK button on the Export as Custom Transformer dialog, the transformer is exported to a separate (.fmx) file. That file is immediately opened inside a new instance of FME Workbench, for you to make edits.
In essence editing a custom transformer works the same way as editing a workspace: you open the file in FME Workbench and make edits as required.
The important part to remember is that each instance of the Custom Transformer that is linked to this file, will be affected by any changes that you make.
| FME Lizard says… |
| It’s best to hunt for bugs in a custom transformer when its definition is embedded, before exporting it. That's because tools such as Feature Caching and Run with Breakpoints do not work inside exported transformers. |
| FME Lizard asks... |
|
Q) Here is a question for you to investigate: Can you nest custom transformers? That is, can you put one custom transformer inside another? Yes, with no restrictionsYes, but you can only nest transformers of the same type (Linked or Embedded)Yes, but you cannot nest Linked Custom TransformersYes, but only a single level of nesting |
When the Insert Mode of a custom transformer allows type switching, the action is very straightforward. Simply right-click on the instance and choose the required type:
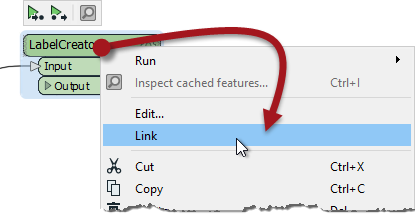
In the above screenshot, the user is switching from Embedded to Linked. Of course, switching to Linked requires the custom transformer to be exported already. If not, there is no option to link the transformer because there is no file to link to!
When you switch from embedded to linked, then the embedded definition is closed. The transformer instance then points to the linked definition.
When you switch from linked to embedded, the contents of the fmx file are copied and embedded in the workspace. The transformer instance then points to the embedded definition.
If there is more than one instance of the Custom Transformer, you are asked whether you want to switch all of them:
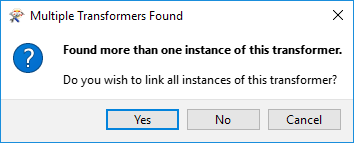
The usual answer to this is yes because having the same transformer both embedded and linked could be quite confusing! If you answer no, then be aware that the transformer you clicked on will be linked (but none of the other instances will).
| FME Lizard says… |
| Switching from Embedded to Linked only works as long as the two versions are the same. In other words, if you embed a linked transformer and then make changes to the embedded definition, you won’t be able to revert to the linked version. |
FME allows external file definitions of a custom transformer to exist as a number of versions. Each time a custom transformer definition is edited, a new version can be saved.
In that way, a single fmx file can contain multiple versions of the same custom transformer.
Versioning allows the author of a custom transformer to revert to a previous definition, should the need arise. It also allows a separate definition to be created for each version of FME. The custom transformer remains backwards-compatible with older FME versions, but takes advantage of enhanced functionality in newer versions.
After editing an unversioned custom transformer, clicking the save button issues the following prompt:
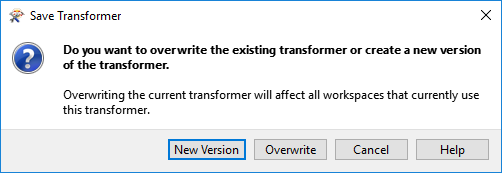
The two versioning options are to Overwrite the existing version or to create a New Version.
Essentially, the prompt asks whether to activate versioning. Clicking New Version versions the transformer and saves the edits as version 2. Note that creating a new version does not create a separate fmx file; instead, it creates a separate version of the transformer within the same fmx file.
The title bar in Workbench illustrates the version number of a custom transformer file:

If you choose Overwrite in the Save Transformer dialog, then the transformer remains unversioned.
Opening a versioned custom transformer in Workbench issues the following prompt:
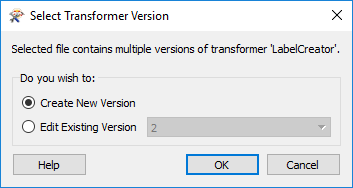
This prompt asks which version you wish to edit, or whether you want to just start with a new version. This way you can:
It's important to be aware that this dialog is the only way to create a new version. Clicking the save button merely saves updates to the currently open version. To forcibly create a new version you need to close and reopen the file, causing the Select Transformer Version dialog to appear.
Each version of a custom transformer is associated with a particular FME version. You can choose to make edits to a transformer that was last edited in an older version of FME, but you will receive a warning message:

Here version 1 was created with FME 2018, and the author is attempting to edit it in FME 2019. Should they go ahead and do so, version 1 of the transformer will no longer be valid for use in FME 2018.
| FME Lizard says… |
| Sometimes you can get confused about these dialogs (well, I can) so let me set you straight: When a custom transformer is first exported, you don't get the Select Version dialog (because the transformer is still unversioned) and you don't get the Save Version dialog (because why create a new version when this transformer was just exported?) When you open the definition (fmx file) the next time, you again don't get the Select Version dialog (because it is still unversioned), but you will get the Save Version dialog when you save the changes, allowing you to make the transformer versioned. From that point on, you'll always get the Select Version dialog when you open the fmx file (because the transformer is now versioned) but for the same reason, you'll never get the Save Version dialog when you save edits. |
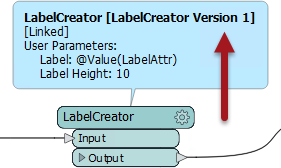
If the option to display the transformer version is turned on (Tools > FME Options > Transformers > Display transformer version) then each linked custom transformer displays its version number in summary annotation:
When FME detects that a new version is available (i.e., the author has made edits and saved them as a new version) and that this version is compatible with the FME version being used, then an option appears on the context menu to allow an update:
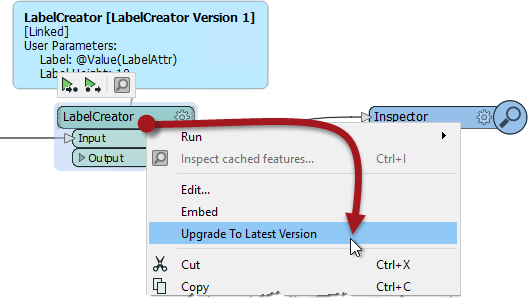
Choosing to upgrade means the transformer becomes linked to the latest version, and the summary annotation updated to reflect this.
| FME Lizard says… |
FME checks for new versions only when Workbench is first started. If Workbench is already open and you wish to check for a new custom transformer version, you can force FME to check by clicking the refresh button on the Transformer Gallery window: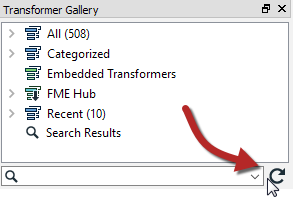 |
| FME Lizard asks... |
|
Q) You have a workspace with a linked custom transformer (version 1). The author of that transformer makes a series of edits and updates it to version 4. What do you think the upgrade option does to the custom transformer in your workspace? Upgrade it to version 2Upgrade it to version 3Upgrade it to version 4It depends on what version of FME you and the author are using |