Create an Event |

|

|

|
|
Create an Event |

|

|

|
|
|
||
The event form used to create a new event can be accessed from various places in the application, including:
•The homepage - click Add Event from the Activity widget
•The calendars and scheduling grids - click on the calendar, or click/click and drag on a scheduling grid
•The search for available rooms tool - enter search criteria, then select an available room and create an event
•The event list page itself - click Add on the event list page to create a new event from scratch
Regardless of the access point, the event form and creation process is the same.
Here is how you use the form to create events:
Create a Single Meeting Event
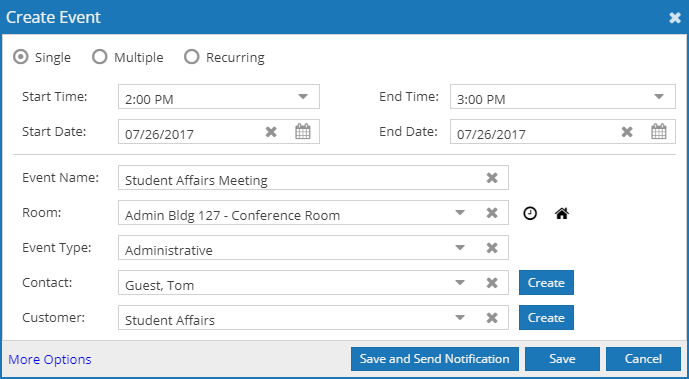
The event form is designed to make the creation of a simple, single meeting event as quick and easy as possible. The form defaults to Single meeting mode, and inherits as much information as possible based on your starting point. For example, if you start the event creation process by clicking and dragging on the scheduling grid, the event form will be pre-populated with date, times, and location. Unless changes are required, you may only need to complete a few fields and then save your event.
To complete the Single meeting creation:
1.Verify that start and end times and date are correct.

2.Enter a name for your event.
3.Verify that your room is correct, or select a different room from the list.
If you know the name, number, or building for the room you would like to schedule, you may start typing it in the room field. The list will be populated with matching rooms.
For a more advanced room search, click the Find Rooms icon (house) and enter search criteria to select an available room.
Alternatively, if a specific room is required but not available at the time you have selected, you may click the Find a Time icon (clock) to explore available time options for the selected room.
4.Select an Event Type.
5.Select a Customer and Contact.
NOTE: If the customer or contact do not exist in the system, you may add them by clicking Create here.
6.Click Save, or click Save and Send Notification to save and also send an event summary to the contact.
NOTE: Prior to saving, you may click the More Options link to switch to the full event form to edit additional details or interact with more advanced features.
Create a Multiple Meeting Event
The Multiple option is provided so that you can create an event with more than one meeting in the same event creation session. The process is virtually the same, except you may select multiple dates from a calendar, and optionally edit times for each meeting.
To create a multiple meeting event:
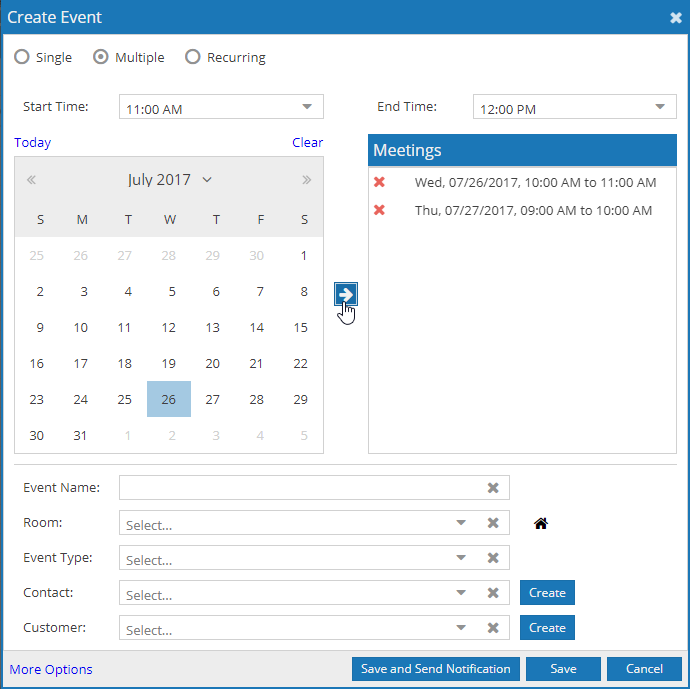
1.When the event form is displayed, select the Multiple option at the top.

2.Enter or verify your start and end times.
3.Click to select one or more dates from the calendar.
4.Click the arrow button to add your meeting(s) to the meeting list on the right.
Note that when adding meetings they are added with the times entered above. You may change your times as you are adding meetings to the list to create different meeting time/date combinations.
5.Finish filling out the event form as described above, and then save your event.
Create a Recurring Event
The Recurring option allows you to create a series of event meetings that repeat in a pattern. To create this type of event, you must simply define your desired recurring pattern using the options provided.
To create a recurring meeting event:
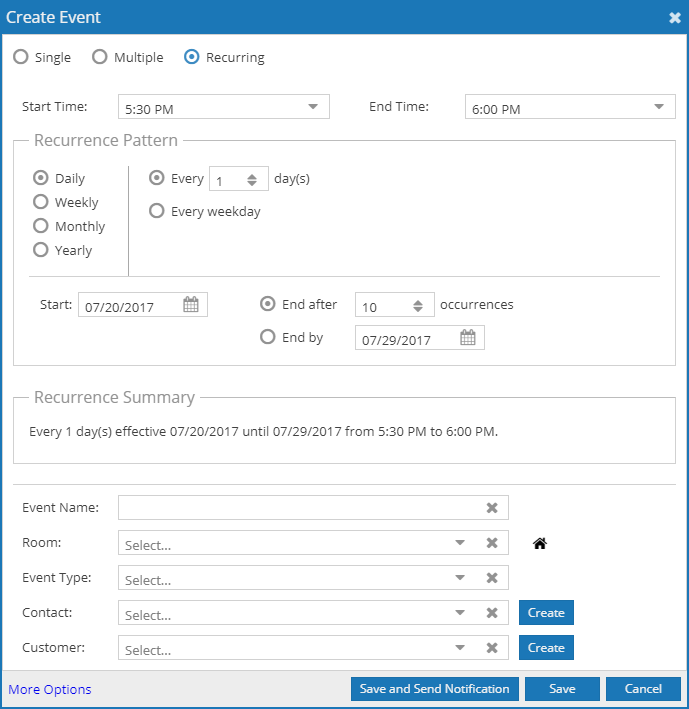
1.When the event form is displayed, select the Recurring option at the top.

2.Enter or verify your start and end times.
3.Click to select a recurrence pattern time frame.
4.Configure the recurrence options applicable to the selected time frame.
5.Enter a start date.
6.Specify either a number of occurrences, or an end-by date.
7.Finish filling out the event form as described above, and then save your event.
See also: