Set up CUR & Generate Server Id - MANUAL
This page describes how to manually setup CUR and generate the Server ID in AWS Migration Hub. If you already used the Setup CUR - AUTOMATED approach, the steps here will not be necessary and you can skip to Step 2 - Activating Tags
This Video Tutorial provides guidance to perform the necessary steps to setup CUR and activate tags as described in this section of the guide.
The Cost and Usage Report (CUR) is enabled once per management account by the team with the right privileges to the management account. An associated Cost and Usage Report then needs to be created to allow tracking of MAP tagged resources.
Pre-requisites:
- Access to the management account(s)listed in your Migration Plan
- Access to the minimum required permissions defined in CURPolicy.json
Part 1 - Create the Cost and Usage Report (CUR):
- Log in to your AWS management account.
- Under services, go to Billing
- In the navigation menu, select Cost & Usage Reports
- Click Create Report.
- In the Report name field, enter the report name with the prefix: map-migrated.
- Select Include resource IDs.
- Click Next

- Under S3 Bucket, click Configure.
- Enter a unique bucket name (for example, map-migrated-report-s3bucket)
- Select a region that Migration Hub is configured to use and click Next.

- Review the policy, confirm that it is correct then click Save.

- Set the Report path prefix with your preferred prefix (for example, map-credits-report).
- Set Time granularity as Daily.
- Set Report versioning as Overwrite existing report.
- Enable report data integration for Amazon Athena.
- Set Compression type as Parquet.
- Click Next and then Review and Complete.

Your Cost and Usage Report now displays in the console as follows

In the next 24 hours, your first report will be delivered to the Amazon S3 bucket you configured during the report creation
Only 1 (one) CUR with the prefix map-migrated should exist in the management (payer) account. Having multiple CUR with prefix map-migrated will disrupt the credit calculation.
Create the first cost allocation tags
For general MAP workloads (workloads other than Database & Analytics workloads, and customers in the MAP for SAP program), we will use the tag keys map-migrated and map-migrated-app. For Database & Analytics workloads, and customers in the MAP for SAP program, an alternative tag(s) will be required. Refer to the section What tags should I use? for SAP and Database & Analytics workloads.
After setting up the Cost and Usage Report, you need to activate the tag allocation for the MAP tags. To do this, you need to initially use those tags at least for one of the resources. For this purpose, use the Amazon S3 bucket you’ve configured to deliver the report in the previous step to have the following tags applied but with no value:
- In the AWS console, under services, go to S3.
- Click the bucket you created during the CUR creation.
- Click the Properties tab.
- Under Advanced Settings click on Tags.
- Enter keys with the following names:
- map-migrated
- You can optionally create the following additional tags if they are relevant for your migration project and MAP Migration Tracking and Incentive Guide.
- map-dba
- map-sap
- Leave the Value field empty for each tag.
- Click Save.
Tag keys are case sensitive. Make sure you use lower case in all the tag names

Part 2 - Generate the Server ID
- Download the CSV file here
- In the Hostname column, add the following hostname:
samplehostname-MPE. The MPE number is provided at the top of your Migration Plan. E.g. samplehostname-MPE12345 - In the Tags column, add the following tag/value:
aws-migration-project-id:MPE. The MPE number is provided at the top of your Migration Plan.MPEis case sensitive and must be upper case. E.g. aws-migration-project-id:MPE12345 - If you have multiple MAP Migration Plans, you will require unique server Id for each migration plan. Please refer to this section for generating additional server id.
- Go to the AWS Management Console and chose Migration Hub. If this is your first time using Migration Hub, you will need to choose its home region
Now, you need to import the CSV file into the Migration Hub:
- In the AWS Management Console, under services, go to Migration Hub
- In the navigation pane, select Tools Under Discover and then click Import
- In the Import name, add a name for the import task
- Click Go to S3, to upload the CSV file that you created earlier to any existing S3 bucket (or a new bucket if needed)
- In Amazon S3 Object URL, add the S3 object URL for the CSV file that you uploaded in the previous step
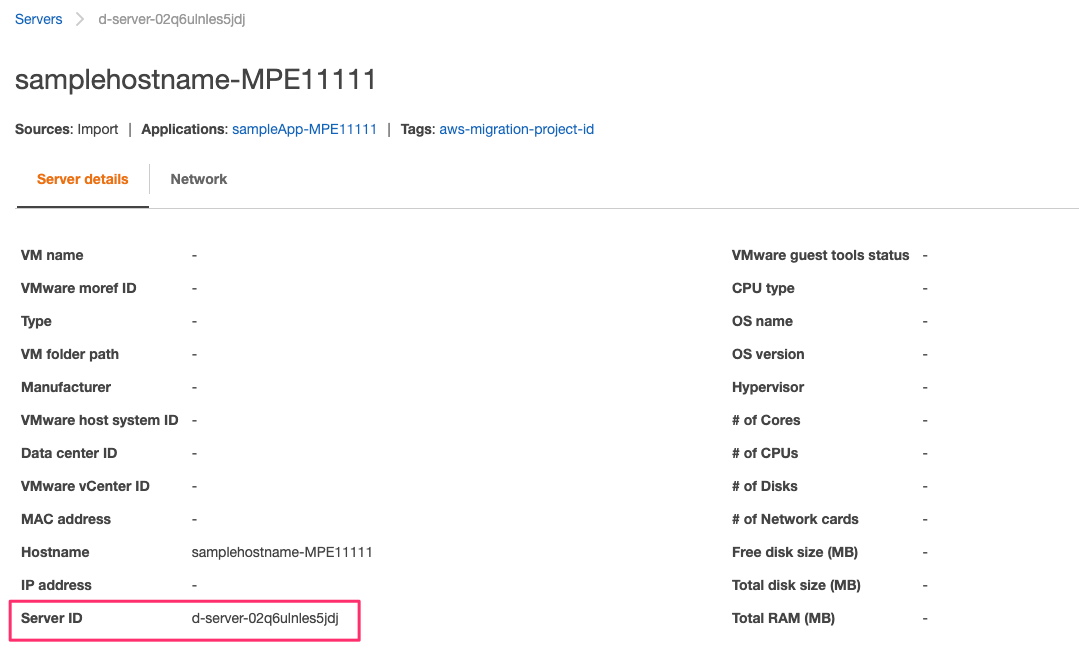
- Click Import. Once the import task completed, you will see the import details

 In the example above MPE11111 is used. You should see the MPE number related to your MAP term.
 The Server ID obtained from the AWS Migration HUB has a value of d-server-… This should be the value used to tag your migrated workloads.