AWS Migration Acceleration Program - tagging instruction guide
AWS - Migration Acceleration Program
Tagging Instructions guide
Table of contents:
Migration Acceleration Program
Getting Started
Step 1 - Set up CUR & Generate Server Id
- Step 1 - Set up CUR & Generate Server Id
- Set up CUR & Generate Server ID - AUTOMATED
- Set up CUR & Generate Server Id - MANUAL
- Set up CUR & Generate Server ID - AMS Advanced Customers
Step 2 - Activating Tags
Step 3 - Tagging Resources
Additional Resources
AWS Migration Acceleration Program - tagging instruction guide
Categories
Frequently Asked Questions
What tags should I use?
- What tags should I use?
- MAP 2.0 Tag Selection Tool
- Database and Analytics Tags
- SAP Workload Tags
- Examples
Tags
Troubleshooting
Getting Started
Overview
The purpose of the Migration Acceleration Program (MAP) is to help AWS customers accelerate their migration to AWS. As a customer moves their existing on-premises workloads to AWS, the migrated workloads are identified through a mechanism called tagging, which enables them to display AWS Cost and Usage Report (CUR) based on the migrated resources, which can be utilized to report migrated workloads’ spend and generate appropriate credits.
Tagging your migrated resources is a requirement as part of the MAP 2.0 program. Not enabling CUR or not tagging the migrated resources will result in not applying MAP credits in your account.
Migration Acceleration Program
Tagging Instructions guide
About this guide
This guide helps customers with their migration to AWS as part of the Migration Acceleration Program by detailing how to use tagging for their migrated workloads. Tagging enables customers to display Cost and Usage Report (CUR) based on the migrated resources, which can be utilized to report migrated workloads’ spend and generate appropriate credits.
Customers are responsible for making their own independent assessment of the information in this document. The content provided in this document: (a) is for informational purposes only, (b) represents current AWS product offerings and practices, which are subject to change without notice, and (c) does not create any commitments or assurances from AWS or its affiliates, suppliers, or licensors. AWS content, products, and services are provided “as is” without warranties, representations, or conditions of any kind, whether express or implied. The responsibilities and liabilities of AWS to its customers are controlled by AWS agreements, and this document does not modify those agreements.
What is Tagging?
Tagging is a way to assign a label to an AWS resource. Tags enable you to categorize your AWS resources in different ways. For example, you can categorize by purpose, owner, department,or environment. Each tag consists of a key and an optional value (for example, Department: Finance), both of which you define.
Why is tagging important for MAP?
For the purposes of MAP, tagging of migrated workloads with the specific map-migrated tag (tag key is case sensitive) is necessary to enable the following:
- Tracking of the migration inventory scope, as it is migrated over time from your existing environment to AWS
- Identification of the specific AWS resources being used in place of existing pre-migration resources
- Collecting the cost and usage data of all the migrated resources, which can be used by you to report TCO and other financial data
The tagging exercise is done when the workload is migrated to AWS. Typically, tags are applied by the workload owners who will be migrating their workloads. This process is repeated as workloads are moved across until the entire MAP migration scope has been migrated.
Tagging your AWS resources is a best practice even outside of MAP. For more information, see the Tagging Best Practices Whitepaper.
What is CUR?
Why CUR is important?
The AWS Cost and Usage Reports (AWS CUR) contain the most comprehensive set of cost and usage data available. You can use Cost and Usage Reports to publish your AWS billing reports to an Amazon Simple Storage Service (Amazon S3) bucket that you own. You can receive reports that break down your costs by the hour, day, or month, by product or product resource, or by tags that you define yourself. AWS updates the report in your bucket once a day in comma-separated value (CSV) format. You can view the reports using spreadsheet software such as Microsoft Excel or Apache OpenOffice Calc, or access them from an application using the Amazon S3 API.
AWS Cost and Usage Reports track your AWS usage and provide estimated charges associated with your account. Each report contains line items for each unique combination of AWS products, usage type, and operation that you use in your AWS account. You can customize the AWS Cost and Usage Reports to aggregate the information either by the hour, day, or month.
AWS Cost and Usage Reports can do the following:
- Deliver report files to your Amazon S3 bucket
- Update the report up to three times a day
- Create, retrieve, and delete your reports using the AWS CUR API Reference
For more information about AWS Cost and Usage Reports please check on this link
Migration tracking through tagging
We rely on existing, publicly available services within AWS: Custom tags, AWS Cost andUsage Reports(AWS CUR), and AWS Migration Hub. MAP’s migration tracking mechanism uses native AWS functionality which we will configure in four steps:
- Set up the Cost and Usage Report and generate the Server Id
- Activate cost allocation tags
- Tag the migrated resources in scope with the Server Id
Requirements
You will need:
- AWS Migration Program Engagement number (MPE number). You can find this number in your Migration Plan.
- Access to AWS management account(s) listed in your Migration Plan, and privileges allowing you to make changes to Cost and Usage Report, to activate Cost Allocation Tags and to create Amazon S3 buckets in the management account(s)
- Access to AWS Migration Hub service
The next section will walk you through step-by-step implementation of this mechanism.
Step 1 - Set up CUR & Generate Server Id
There are 2 existing methods to enable CUR in your AWS account and have it ready for MAP. The CUR setup can be MANUAL or AUTOMATED through the utilization of AWS CloudFormation Scripts.
Please check below to determine which process is suitable for your needs.
| Automated (RECOMMENDED!) | Manual | AMS Advanced Customers |
|---|---|---|
 |
 |
 |
This is a one-time process done for each management (payer) account in your Migration Plan, and needs to be done at least 48 hours before the planned migration.
In the case of SAP workloads if you are participating in MAP for SAP, this must be done 48 hours before the purchase of the RI or Savings Plan, not the actual migration.
The steps mentioned above should be used when configuring CUR on your AWS account for the first time, with a single Migration Plan MPE number. For multiple Migration Plan MPE numbers, execute one of the options above, then add the additional accounts later using the manual process listed here.
Set up CUR & Generate Server ID - AUTOMATED
You can utilize the Automated option to quickly setup your Cost and Usage Report (CUR) in your management account(s) listed in your Migration Plan and generate a Server ID that you will be using to tag your MAP eligible workload.
With the Automated option, you use a CloudFormation template that creates the necessary resources and configuration in your account to correctly setup your Cost and Usage Report (CUR) for MAP.
The following steps should be used when configuring CUR your AWS account for the first time, with a single Migration Plan MPE number. For multiple Migration Plan MPE numbers, please add the additional accounts later using the manual process listed here.
Pre-requisites:
- Set a Home Region for AWS Migration Hub. This should be the same region where the CloudFormation template will be executed.
- Access to the management account(s)listed in your Migration Plan
- Access to the minimum required permissions defined in CURPolicy.yaml
Step by step instructions
- Log in to the management account(s) listed in your Migration Plan
- Set the Home Region for AWS Migration Hub
- Select your region (it should match the Migration Hub Home Region you set in step 2)
- Navigate to Services -> CloudFormation. Click on Create stack
- Select ‘Template is ready’ and provide the following URL https://map-automation.s3.us-west-2.amazonaws.com/cur-server-ids-automator.yaml
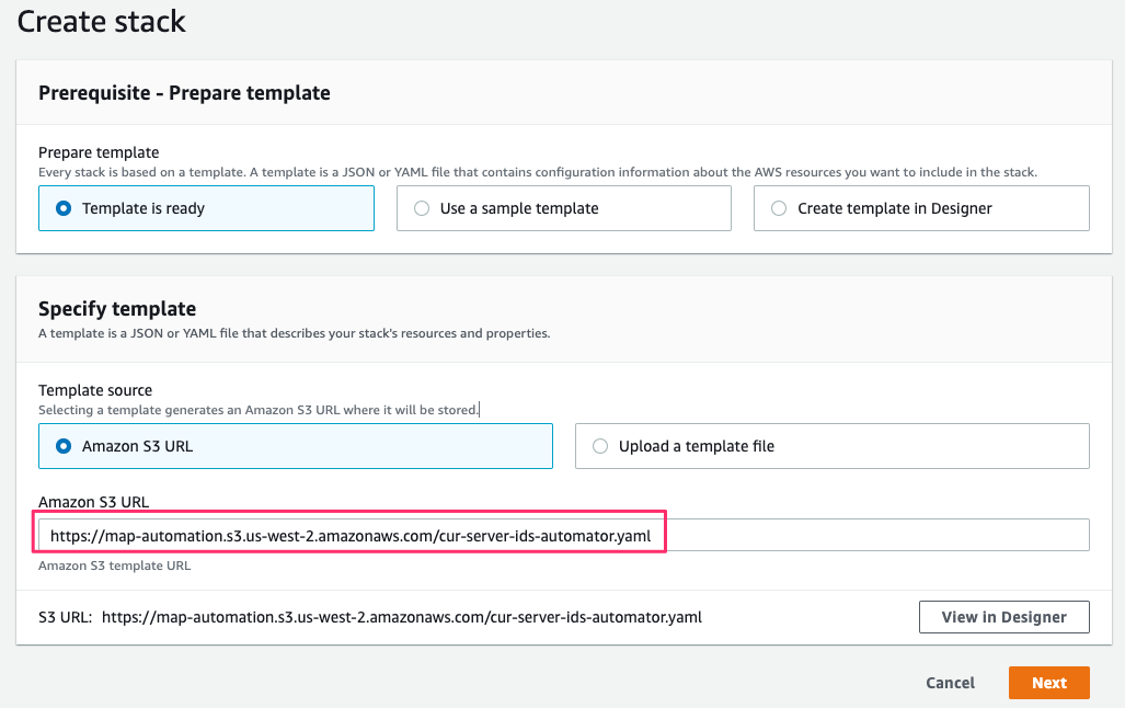
- Click next
- Give the stack a name. (e.g. MAP-CUR)
- In the Parameters section, provide the MPE number, and the region where you’d like to create CUR (only regions supported by AWS Migration Hub are supported).
- The MPE parameter must begin with
MPEfollowed by the MPE number.MPEis case sensitive and must be upper case. - The region should match the AWS Migration Hub Home region.
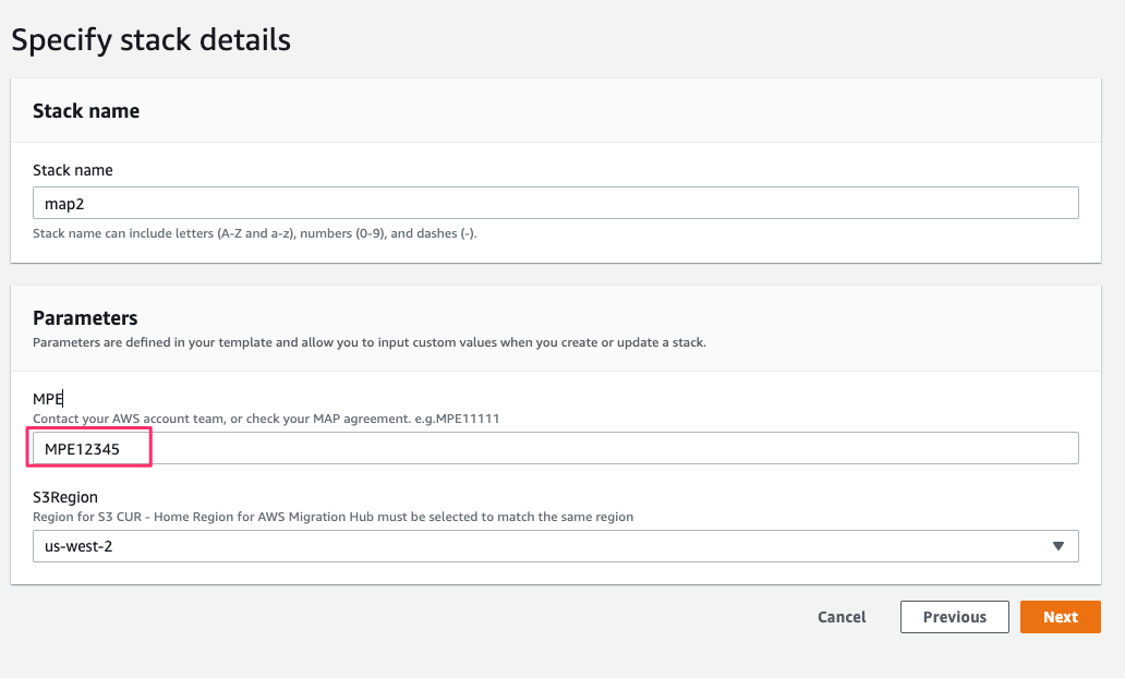
- The MPE parameter must begin with
- In the “Configure Stack Options” step, click next and in the following page check “I acknowledge that AWS CloudFormation might create IAM resources with custom names.” and “I acknowledge that AWS CloudFormation might require the following capability: CAPABILITY_AUTO_EXPAND”.
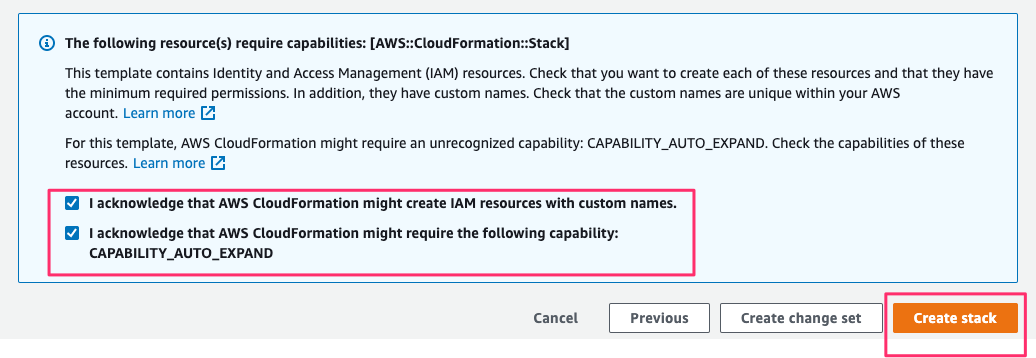
- The template will take about 2 minutes to complete. When completed, switch to the Outputs tab and take a note of the Server ID generated.

- Take a note of the Server ID generated. You will be using this ID to tag your MAP workload to calculate MAP Credits.
Testing CUR
The CUR should have now been created. To confirm, go to Services > Billing > Cost & Usage Reports. You should see a map-migrated-report report name.
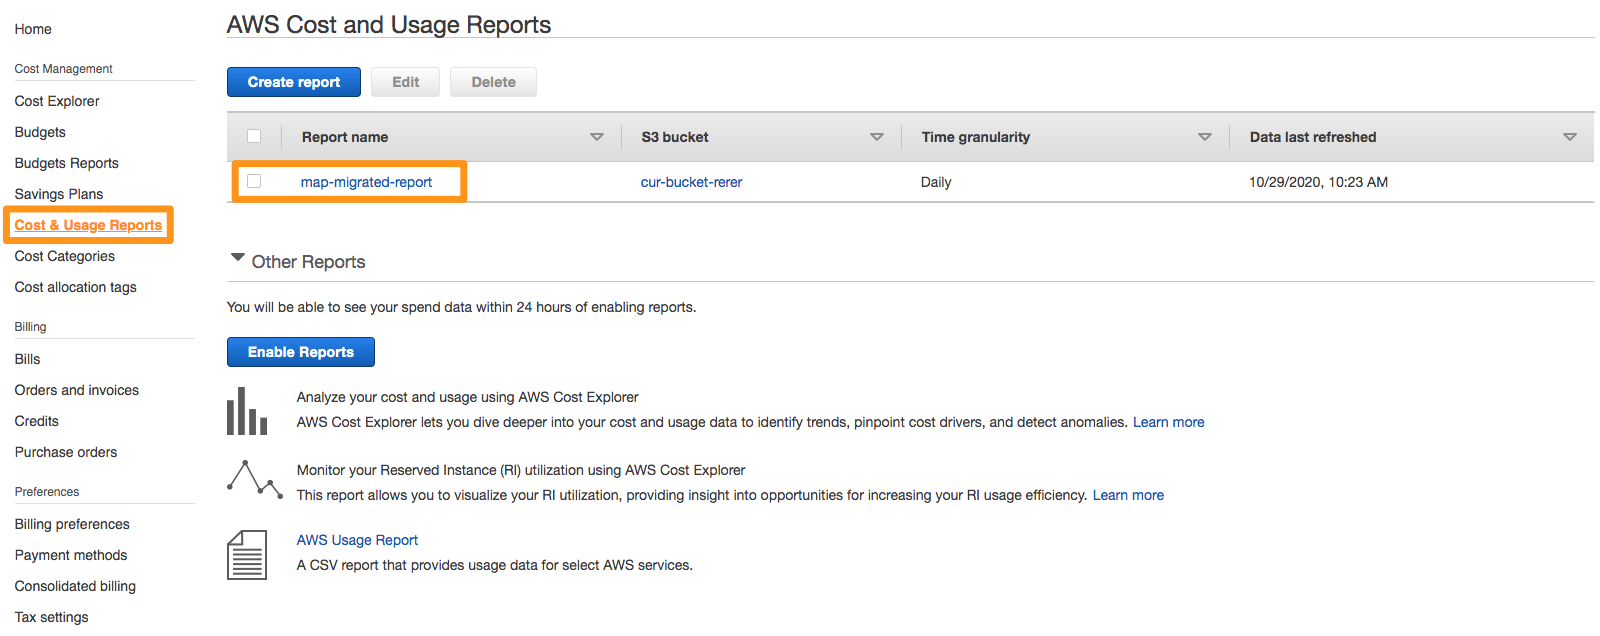
Only 1 (one) CUR with the prefix map-migrated should exist in the management (payer) account. Having multiple CUR with prefix map-migrated will disrupt the credit calculation.
The created CUR S3 bucket has been tagged with the Server ID generated as part of this process. This will help AWS validate the Credit generation in your account.
In the next 24 hours, your first report will be delivered to the Amazon S3 bucket you configured during the report creation.
Step 1 - Setup CUR & Generate ServerID is completed! Please move forward to Step 2 - Activating Tags
Set up CUR & Generate Server Id - MANUAL
This page describes how to manually setup CUR and generate the Server ID in AWS Migration Hub. If you already used the Setup CUR - AUTOMATED approach, the steps here will not be necessary and you can skip to Step 2 - Activating Tags
This Video Tutorial provides guidance to perform the necessary steps to setup CUR and activate tags as described in this section of the guide.
The Cost and Usage Report (CUR) is enabled once per management account by the team with the right privileges to the management account. An associated Cost and Usage Report then needs to be created to allow tracking of MAP tagged resources.
Pre-requisites:
- Access to the management account(s)listed in your Migration Plan
- Access to the minimum required permissions defined in CURPolicy.json
Part 1 - Create the Cost and Usage Report (CUR):
- Log in to your AWS management account.
- Under services, go to Billing
- In the navigation menu, select Cost & Usage Reports
- Click Create Report.
- In the Report name field, enter the report name with the prefix: map-migrated.
- Select Include resource IDs.
- Click Next

- Under S3 Bucket, click Configure.
- Enter a unique bucket name (for example, map-migrated-report-s3bucket)
- Select a region that Migration Hub is configured to use and click Next.

- Review the policy, confirm that it is correct then click Save.

- Set the Report path prefix with your preferred prefix (for example, map-credits-report).
- Set Time granularity as Daily.
- Set Report versioning as Overwrite existing report.
- Enable report data integration for Amazon Athena.
- Set Compression type as Parquet.
- Click Next and then Review and Complete.

Your Cost and Usage Report now displays in the console as follows

In the next 24 hours, your first report will be delivered to the Amazon S3 bucket you configured during the report creation
Only 1 (one) CUR with the prefix map-migrated should exist in the management (payer) account. Having multiple CUR with prefix map-migrated will disrupt the credit calculation.
Create the first cost allocation tags
For general MAP workloads (workloads other than Database & Analytics workloads, and customers in the MAP for SAP program), we will use the tag keys map-migrated and map-migrated-app. For Database & Analytics workloads, and customers in the MAP for SAP program, an alternative tag(s) will be required. Refer to the section What tags should I use? for SAP and Database & Analytics workloads.
After setting up the Cost and Usage Report, you need to activate the tag allocation for the MAP tags. To do this, you need to initially use those tags at least for one of the resources. For this purpose, use the Amazon S3 bucket you’ve configured to deliver the report in the previous step to have the following tags applied but with no value:
- In the AWS console, under services, go to S3.
- Click the bucket you created during the CUR creation.
- Click the Properties tab.
- Under Advanced Settings click on Tags.
- Enter keys with the following names:
- map-migrated
- You can optionally create the following additional tags if they are relevant for your migration project and MAP Migration Tracking and Incentive Guide.
- map-dba
- map-sap
- Leave the Value field empty for each tag.
- Click Save.
Tag keys are case sensitive. Make sure you use lower case in all the tag names

Part 2 - Generate the Server ID
- Download the CSV file here
- In the Hostname column, add the following hostname:
samplehostname-MPE. The MPE number is provided at the top of your Migration Plan. E.g. samplehostname-MPE12345 - In the Tags column, add the following tag/value:
aws-migration-project-id:MPE. The MPE number is provided at the top of your Migration Plan.MPEis case sensitive and must be upper case. E.g. aws-migration-project-id:MPE12345 - If you have multiple MAP Migration Plans, you will require unique server Id for each migration plan. Please refer to this section for generating additional server id.
- Go to the AWS Management Console and chose Migration Hub. If this is your first time using Migration Hub, you will need to choose its home region
Now, you need to import the CSV file into the Migration Hub:
- In the AWS Management Console, under services, go to Migration Hub
- In the navigation pane, select Tools Under Discover and then click Import
- In the Import name, add a name for the import task
- Click Go to S3, to upload the CSV file that you created earlier to any existing S3 bucket (or a new bucket if needed)
- In Amazon S3 Object URL, add the S3 object URL for the CSV file that you uploaded in the previous step
- Click Import. Once the import task completed, you will see the import details

 In the example above MPE11111 is used. You should see the MPE number related to your MAP term.
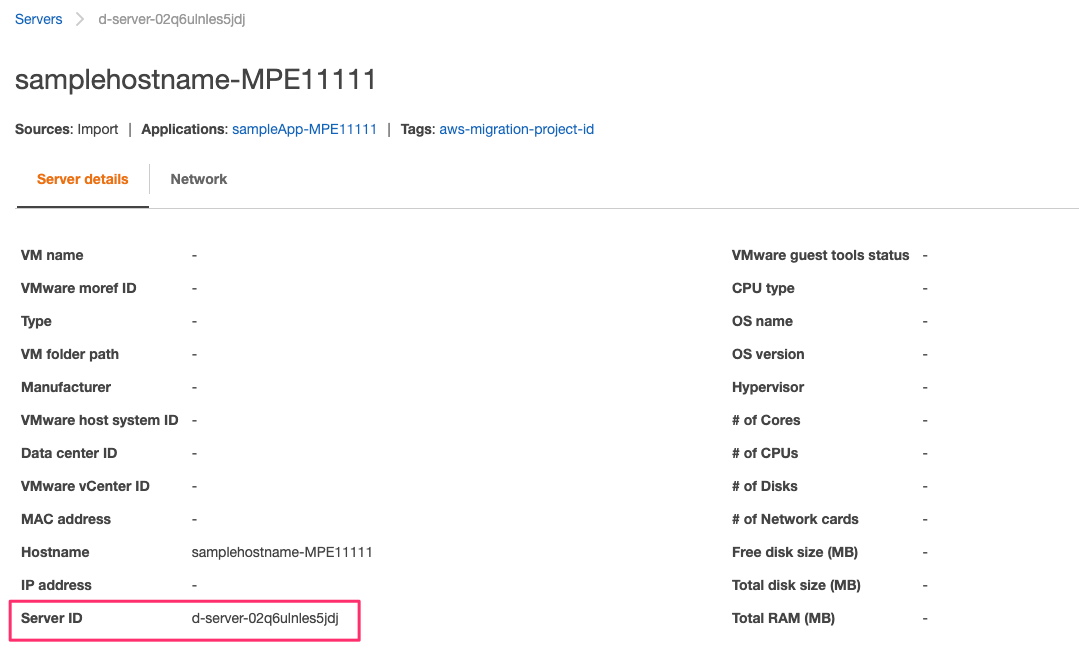 The Server ID obtained from the AWS Migration HUB has a value of d-server-… This should be the value used to tag your migrated workloads.
Set up CUR & Generate Server ID - AMS Advanced Customers
This page describes how to request Amazon AMS team to setup CUR in your account. Only use this instruction if you are an Amazon AMS Advanced Customer. If you are an AWS AMS Accelerate Customer, please follow the AUTOMATED or MANUAL options.
MAP 2.0 Installation for AMS
To setup the MAP 2.0 automation solution there is one manual RFC that needs to be submitted from your management account. After the RFC is complete, the AMS team will provide you the Server ID value which will be used to tag your migrated workloads to calculate MAP Credit.
Deploy the MAP 2.0 Automator
Submit a Create other RFC requesting an IAM role to be deployed and a CloudFormation stack to be created. Use the following language for the RFC details:
RFC Information
Account: Management account
RFC Type: Create other
Details:
Please execute the following steps: Create the IAM role needed for the MAP 2.0 Automator from this link:
https://map-automation.s3.us-west-2.amazonaws.com/cur-server-ids-automator-iam.yaml
Create a stack using the following CloudFormation from this link:https://map-automation.s3.us-west-2.amazonaws.com/cur-server-ids-automator-ams.yaml
Stack name:
map-automator
Parameters
S3Region - {{Choose the home region for MALZ}}
MPE - {{Customer MPE ID (e.g: MPE12345)}}
Finally, from the stack output, provide the customer with theServerIDvalue. This is the value they must use when tagging their workloads.
Only regions supported by AWS Migration Hub are valid. For a list of the support regions check https://docs.aws.amazon.com/general/latest/gr/migrationhubn.html.
Step 2 - Activating Tags
After setting up CUR you have to wait 24 hours before executing the steps below.
Regardless of using the AUTOMATED or the MANUAL process, the tags will have to be manually activated in the billing console.
As part of this process, we generate all the tags that you may use for MAP. For general MAP workloads (workloads other than SAP, and Database & Analytics workloads), you only need to activate map-migrated tag.
For SAP, and Database & Analytics workloads, please refer to the section What tags should I use?.
Tag keys are case sensitive. All cost allocation tags for MAP are in lower case.
The CloudFormation template used in the previous section creates the necessary tags. You need to activate the cost allocation tags that apply to your workload using the following steps:
- In the AWS console, under services, go to Billing.
- In navigation panel, go to Cost allocation tags.
- Click the checkboxes for the tags created:
- map-migrated -aws-migration-project-id
- any other map-* related tag
- Click Activate
- The status of the tags should now be Active.

Once you create your cost allocation tags for the first time (e.g., map-migrated), it may take up to 24 hours to be visible in your account. If you can’t see the tags in your account as shown above, revisit this step after 24 hours
Step 3 - Tagging Resources
Now that AWS CUR is set up, the AWS tags have been activated in CUR, and you already have your Server ID it’s time to start tagging the migrated resources properly so that they are included in your MAP Credit calculations.
If you’re using an Infrastructure-As-Code tool (e.g., AWS CloudFormation or Terraform) to create your migrated resource on AWS then you can add a tag line to your templates with the Server ID generated in Step 1.
If you’re creating resources directly using AWS Console then you can tag the resources individually, or you can bulk tag them using AWS Tag Editor.
| Manual | AWS Tag Editor |
|---|---|
 |
 |
Manual tagging
In order to start tagging, you need the generated Server ID from Step 1 - Set up CUR & Generate Server ID.
In this section we will show you a simple example of manual tagging for one of the migrated resources. We will use the AWS Management Console for this purpose.
To get the Server ID from the Automated pipeline
If you used the Step 1 - Set up CUR & Generate Server ID process to generate your Server ID’s, please use the CloudFormation output value Server ID as reference for tags.
- Go to the migrated resources (for example, Amazon RDS) and choose
Add tags. - In the
Add tagsbox, usemap-migratedas theTag Keyand use theServer IDyou copied from the previous step as theValuethen clickAdd.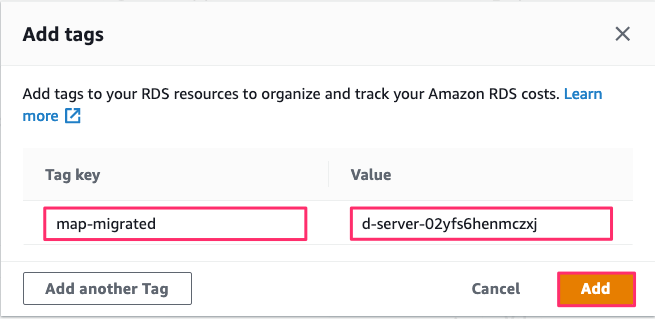
- Repeat the previous step for any other associated resources (e.g. Snapshots)
For more details about tagging resources, please use AWS documentation.
AWS Tag Editor
In order to start tagging, you need the generated Server ID from Step 1 - Set up CUR & Generate Server ID.
In this section we will show you a simple example of manual tagging for one of the migrated resources. We will use the AWS Management Console for this purpose.
Get the Server ID
If you used the Step 1 - Set up CUR & Generate Server ID process to generate your Server ID’s, please use the CloudFormation output value ServerI D as reference for tags.
To apply tags using AWS Resource Groups & Tag Editor:
- Open AWS Console
- Navigate to Resource Groups & Tag Editor, Tagging, Tag Editor
- Specify:
- The region(s) where your resources are. For example: us-east-1
- Select the type of resources you’d like to bulk tag. For example: EC2, Lambda,S3
- Click Search resources

- The search will return all the resources that meet the conditions you selected. If you’d like to tag all of them select All and then click Manage Tags of selected resources

- In Edit tags of all selected resources, add map-migrated tag with the value of the Server ID you generated previously. Then click Review and apply tag changes

What tags should I use?
Tag selector tool
This tool was developed to guide you to select the right tags for your workload.
Database and Analytics Tags
For Migration Plans whose Migration Tracking and Incentive Guide includes Databases and Analytics MAP Credits.
SAP Workload Tags
For Migration Plans in the MAP for SAP program, using the MAP for SAP Migration Tracking and Incentive Guide. Migration Plans that are not part of MAP for SAP do not use these tags.
Examples
Some examples on what tags should be used during your MAP 2.0 migration
MAP 2.0 Tag Selection Tool
| Select Source | Select Destination |
| Context: | |
| Tag keys to be used: | |
| Tag Examples: | |
| Additional Notes: |
Database and Analytics Tags
For Migration Plans whose Migration Tracking and Incentive Guide includes Databases and Analytics MAP Credits, an alternative tag(s) needs to be activated in cost allocation tags and to be used for the migrated resources. Several scenarios based on the source and destination are listed in the following table.
| Source | Destination | Tag Key | Tag Value |
|---|---|---|---|
| On-premises non-commercial Database | EC2 non-commercial Database | map-migrated | ServerID generated from Step 1 |
| On-premises non-commercial Database | RDS PostgreSQL/MySQL | map-migrated | ServerID generated from Step 1 |
| On-premises Commercial Database | EC2 Oracle/SQL Server | map-migrated | ServerID generated from Step 1 |
| On-premises Commercial Database | RDS Oracle/SQL Server | map-migrated | ServerID generated from Step 1 |
| On-premises Commercial Database | RDS PostgreSQL/MySQL | map-dba | ServerID generated from Step 1 |
| On-premises Commercial Database | Amazon Aurora | map-dba | ServerID generated from Step 1 |
| On-premises Commercial Database | Amazon DynamoDB | map-dba | ServerID generated from Step 1 |
| EC2 non-commercial Database | RDS PostgreSQL/MySQL | map-migrated aws-migration-project-id |
ARN value of the source EC2 instance MPE Number |
| EC2 Commercial Database | RDS Oracle/SQL Server | map-migrated aws-migration-project-id |
ARN value of the source EC2 instance MPE Number |
| EC2 Commercial Database | Amazon Aurora | map-dba aws-migration-project-id |
ARN value of the source EC2 instance MPE Number |
| EC2 Commercial Database | DynamoDB | map-dba aws-migration-project-id |
ARN value of the source EC2 instance MPE Number |
| RDS Oracle/SQL Server | RDS PostgreSQL/MySQL | map-dba aws-migration-project-id |
ARN value of the source RDS instance MPE Number |
| RDS Oracle/SQL Server | Amazon Aurora | map-dba aws-migration-project-id |
ARN value of the source RDS instance MPE Number |
| RDS Oracle/SQL Server | DynamoDB | map-dba aws-migration-project-id |
ARN value of the source RDS instance MPE Number |
A commercial database is defined as any third-party database engine, data warehouse, or analytics offering for which you have paid a fee for use rights, enhancements, maintenance, or support for that third party offering.
For more information on ARN format, please check the ARN section on Additional Resources page.
MPE is case sensitive and must be upper case.
SAP Workload Tags
For Migration Plans in the MAP for SAP program, using the MAP for SAP Migration Tracking and Incentive Guide, an alternative tag, map-sap, will be required to be activated and used for MAP for program. Migration Plans that are not part of MAP for SAP do not use this tag.
| Source | Destination | Tag Key | Tag Value |
|---|---|---|---|
| on-premises | AWS | map-sap | ServerID generated from Step 1 |
AWS resources for SAP must consume a three-year Reserved Instance (RI) or Saving Plan (SP) to be included in MAP Credit calculations.
When using AWS Launch Wizard for SAP to deploy your SAP workloads, please make sure you define the MAP tags as part of your infrastructure definition. Tag Key:map-sap, Tag Value: ServerID generated from Step 1.
Examples
The purpose of this section is to provide few examples of tagging various workloads.
Example 1: Re-hosting using CloudEndure
Customer is moving from on-premises to AWS using a lift-and-shift (re-hosting) migration pattern, and decided to use CloudEndure for the migration.
| Tag Key (automated) | Value (automated) |
|---|---|
map-migrated |
ServerID from Step 1 |
Example 2: DataCenter Migration (mix of migration patterns)
Customer is moving different workloads from on-premises to AWS using various migration patterns (re-hosting, re-architecting, etc.) as part of general MAP.
| Tag Key | Value |
|---|---|
map-migrated |
ServerID from Step 1 |
Example 3: Move to Managed Database
Customer is moving MS SQL databases from Amazon EC2 instances on AWS to Amazon RDS for SQL server as part of MAP for Database.
| Tag Key | Value |
|---|---|
map-migrated |
ARN value of the source EC2 instance |
aws-migration-project-id |
MPE number |
Example 4: Database Modernization
Customer is moving from on-premises MS SQL server to Amazon Aurora. This example is for a Migration Plan that is eligible for Database & Analytics MAP Credits, including both if you are modernizing directly from on-premises or modernizing after migrating to EC2 as a first stage of MAP.
| Tag Key | Value |
|---|---|
map-dba |
ServerID from Step 1 |
For more information on ARN format, please check the ARN section on Additional Resources page.
Troubleshooting
Additional Server Id - Special Cases
Majority of usecases require the use of only one Server Id generated in Step 1. There are a few special cases where it is required to generate additional Server Id. The special cases and the procedure to generate additional server Id are listed below:
Special cases
You will be required to generate additional Server Id for the following:
- For every new MAP Migration plan using the same Payer AWS account Id.
- For use of Amazon EMR (previously called Amazon Elastic MapReduce) service in the migration plan. Also, the additional server Id generated must be used to tag only Amazon EMR resources.
Generate Additional Server Id
Step - 1: Make a note of existing Server Info
- Go to the AWS Management Console and chose Migration Hub. If this is your first time using Migration Hub, you will need to choose its home region
- In the navigation pane, select Servers Under Discover
- Make a note of Server list including existing Server Info, and IP address. The Server List is used to avoid duplicates when generating additional Server Id in the next step.
Step - 2: Prepare CSV File
- Download the CSV file here, and modify the CSV file.
- In the IPAddress column, use an IP Address that is NOT already in the Server list that you have noted previously. E.g.
169.254.37.81or169.254.37.82or so on. The simple method to create an unique IP Address is increment last octet in the example. - In the Hostname column, add the following hostname:
samplehostname-1-MPE. The MPE number is provided at the top of your Migration Plan. Please use an Hostname that is NOT already in the Server list. Assuming MPE number is 12345, example Hostname can besamplehostname-1-MPE12345orsamplehostname-2-MPE12345or so on. The simple method to create an unique Hostname is increment digit between the two-. - In the Tags column, add the following tag/value:
aws-migration-project-id:MPE. The MPE number is provided at the top of your Migration Plan.MPEis case sensitive and must be upper case. E.g. aws-migration-project-id:MPE12345 - Save the changes made to the CSV.
Step - 3: Import CSV file to Migration Hub
- In the AWS Management Console, under services, go to Migration Hub
- In the navigation pane, select Tools Under Discover and then click Import
- In the Import name, add a name for the import task
- Click Go to S3, to upload the CSV file that you created earlier to any existing S3 bucket (or a new bucket if needed)
- In Amazon S3 Object URL, add the S3 object URL for the CSV file that you uploaded in the previous step
- Click Import. Once the import task completed, you will see the import details

 In the example above MPE11111 is used. You should see the MPE number related to your MAP term.
 The Server ID obtained from the AWS Migration HUB has a value of d-server-… This should be the value used to tag your migrated workloads.
Amazon EKS
MAP Tagging Instructions for Amazon EKS
Migration tracking for Amazon EKS will continue to rely on the existing MAP 2.0 tagging process. The tag-key and tag-value will be same as the standard MAP tags as detailed in the MAP Tagging Instruction Guide.
Since Amazon EKS potentially launches multiple AWS services, all of the resources and services launched by Amazon EKS should be tagged. The below guide gives detailed instructions on how to tag all of the Amazon EKS resources correctly.
EKS does not propagate tags as of now. The instructions detailed below are required as an alternate solution until EKS supports tag propagation.
While Kubernetes API allows multiple resource types to be defined from within the context of a cluster, AWS models these resources as internal to the cluster if the resource cannot be shared across multiple clusters or AWS resources. Pricing is based on Amazon EKS cluster hours and the following internal cluster resources:
- Nodes (EC2 instances) : EKS managed nodes or self managed nodes
- Load Balancers -Application load balancer (ALB) or network load balancer (NLB)
- EBS Volumes
In order to apply tags to the Kubernetes cluster itself and all the paid internal cluster resources such as nodes, load balancers and EBS volumes follow the instructions below.
Tagging the Kubernetes cluster
Tags can be added to new or existing Kubernetes clusters using the Amazon EKS console,eksctl, AWS CLI, AWS API, or infrastructure-as-a-code tools.
- For new clusters, during cluster creation, apply tags to a new cluster using the tags parameter on the CreateCluster API action
- For existing clusters, tags can be applied using the TagResourceAPI.
- When using the Amazon EKS console, then tags can be applied to new or existing clusters by using the Tags tab for the cluster.
- When using infrastructure-as-a-code tools, please refer to the respective tool documentation on how to tag Amazon EKS.For instance -if the tool is Terraform, use the tags argument while creating an EKS cluster. To learn more about adding tags using Terraform, visit here.
Tagging the nodes
Tagging nodes within a nodegroup -Amazon EKS cluster can schedule pods on any combination of self-managed nodes and EKS managed nodes. To make sure managed nodes or self managed nodes are tagged properly,follow the instructions below
- Managed nodes: In order to tag nodes in a managed node group, use a custom launch template. Use the TagSpecificationparameter of the launch template to specify tags to apply to nodes (EC2 instances) in their node group. To learn more about specifying tags visit here. Managed node group can be launched with a custom launch templateusing the EKS API, AWS CLI, CloudFormation, or the EKS Console. To learn more visit here.
- Self managed nodes: Tags can be applied to self managed nodes by creating a node group with eksctl using the tags parameter. Tags will be applied to all EC2 instances created as a part of the self managed nodegroup creation.Tags can also be applied to self-managed nodes using the AWS Management Console, to learn more visit here.
Tagging Load Balancers
The AWS Load balancer controller manages AWS Elastic Load Balancers for a Kubernetes cluster. The controller provisions
- Application Load Balancer (ALB): The controller triggers the creation of an ALB when you create a Kubernetes Ingress. In order to tag ALB’s, add the annotation alb.ingress.kubernetes.io/tags on the ALB Ingress controller to specify any additional tags that should be applied to ALB’s created. To learn more about tags annotation visit here. To learn more about setting up an Application load balancing EKS, visit here.
- Network load balancer (NLB): The controller triggers the creation of a NLB when you create a Kubernetes Service of type LoadBalancer using IP targets. To learn more, visit here. In order to tag the network load balancers, add the annotation service.beta.kubernetes.io/aws-load-balancer-additional-resource-tags to the network load balancer during creation. To learn more, visit here. For more information about using a network load balancer on EKS, visit here.
Tagging EBS volumes
The Amazon EBS Container Storage Interface (CSI) driver provides a CSI interface that allows Amazon EKS clusters to manage the lifecycle of EBS volumes. To add tags to the dynamically provisioned EBS volumes, use the command option –extra-tags in the CSI driver. For detailed instructions visit the documentation.
AWS Fargate on EKS
AWS Fargate with Amazon EKS is not included on the MAP 2.0 Services List
References
The tagging instructions are also available in the EKS documentation
- https://docs.aws.amazon.com/eks/latest/userguide/eks-using-tags.html
- https://docs.aws.amazon.com/eks/latest/userguide/load-balancing.html
- https://docs.aws.amazon.com/eks/latest/userguide/alb-ingress.html
- https://docs.aws.amazon.com/eks/latest/userguide/ebs-csi.html
Amazon EMR
MAP Tagging Instructions for Amazon EMR
It is important for you to know the Migration tracking for Amazon EMR (previously called Amazon Elastic MapReduce) when the service is part of your migration plan.
Amazon EMR for the most part will continue to rely on the existing MAP2.0 tagging process. The tag-key will be same as the standard MAP tags as detailed in the MAP tagging instruction Guide. For the tag-value, it is important to make a note of the following:
- Generate a new Server ID for migration tracking of EMR. Please refer to the following section on generating additional Server Id.
- Only the resources (EC2, or EKS) launched or managed by EMR as well as resources of EMR must be tagged using the Server Id obtained from previous step.
- Tags can be added using the Tagging editor from AWS console, AWS Management console of respective AWS service, AWS CLI, AWS API, or infrastructure-as-a-code tools.
EMR allows for tagging propagation. Thus, in most cases, it is sufficient to tag EMR resources, and the resources launched by EMR (like EC2) automatically carry the EMR tags. In select scenarios where there is no actual new resources creation done by EMR (e.g. job submitted to virtual clusters without creation); it is expected that you will tag the respective resources of the dependent AWS services in same way as that of EMR.
References
The tagging instructions are also available in the Amazon EMR documentation.
- https://docs.aws.amazon.com/emr/latest/ManagementGuide/emr-plan-tags.html
- https://docs.aws.amazon.com/emr/latest/EMR-on-EKS-DevelopmentGuide/tag-resources.html
CUR
Validate an existing CUR
The script available at Step 1 - Set up CUR & Generate Server ID / AUTOMATED can validate an existing CUR if the customer has already created one (the existing report name should start with map-migrated). If the current CUR has some parameters that aren’t setup as per MAP requirements, the script will throw logs in CloudWatch notifying the user about the misconfigurations and how to correct them.
This is an example of a broken report validation in CloudWatch.
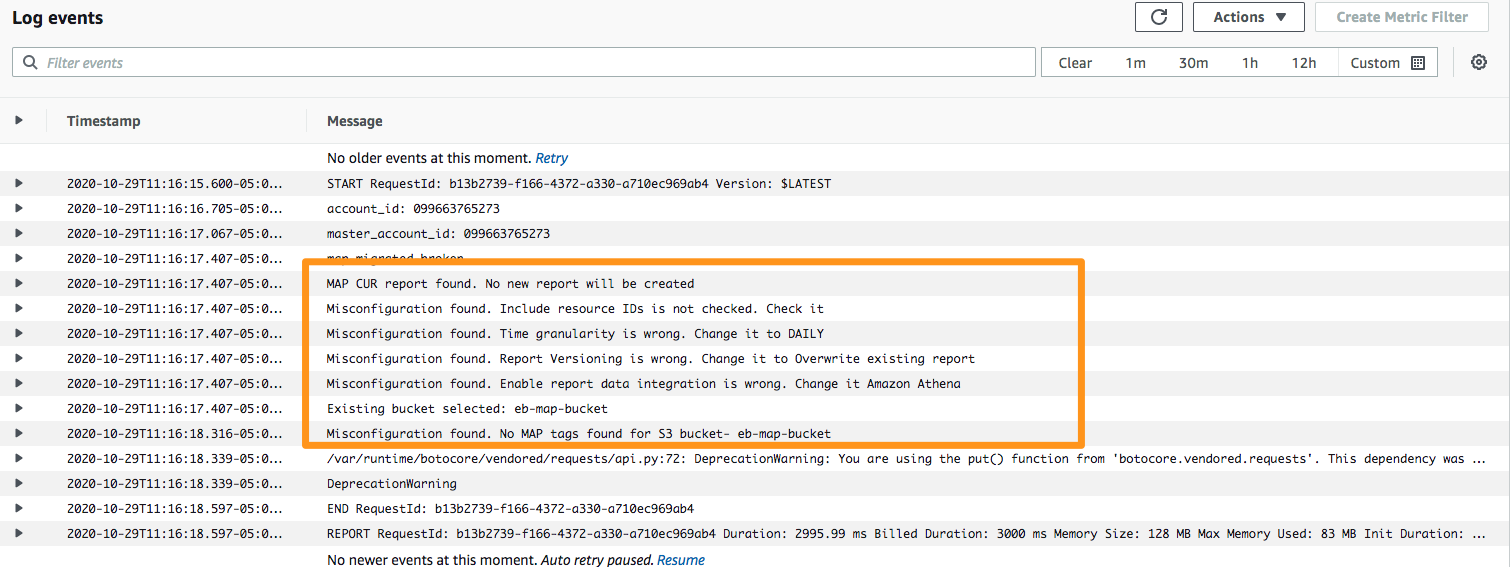
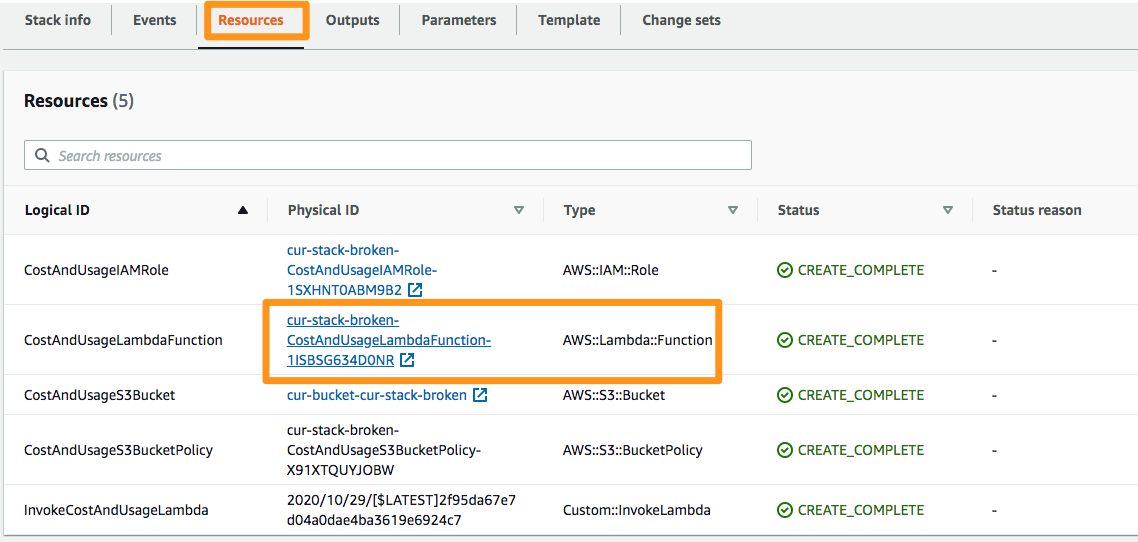
To get to the logs screen go to Resources in CloudFormation, click the Lambda function resource and go to Monitoring > View logs in CloudWatch

Validate running in a management account
Since CUR must be created in a management (payer) account, if a customer runs the script in a non-management account, the script will detect that and won’t create the report. It will notify customer in CloudWatch that they need to switch to a management account.

The Cost and Usage Report (CUR) is enabled once per management account by the team with right privileges to the management payer account. An associated Cost and Usage Report then needs to be created to allow tracking of MAP tagged resources.
Cost Explorer
Cost Explorer Validation
After you have tagged the target AWS resources, if you want to see how much the target AWS resources are used for each management account in your Migration Plan, you can use Cost Explorer to see the approximate amount of the target AWS resources. For more information, see the AWS Billing and Cost Management - Analyzing your costs with Cost Explorer User Guide.
- Log in to your AWS management account.
- On the navigation bar, choose your Account, and then choose My Billing Dashboard.
- In the navigation menu, choose Cost Explorer, and then Click Launch Cost Explorer.
- In the navigation menu, choose Cost Explorer again.
- FILTERS menu, select Tag, enter the map tag name “map-migrated”.
- Click apply filters
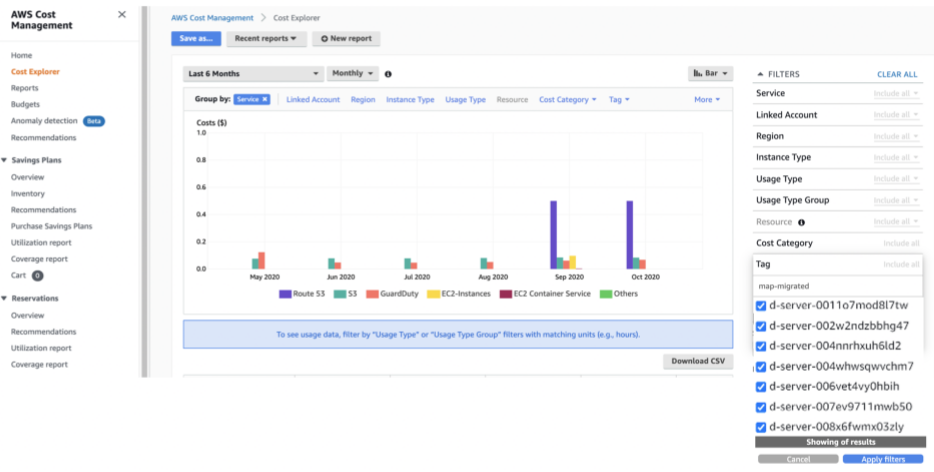
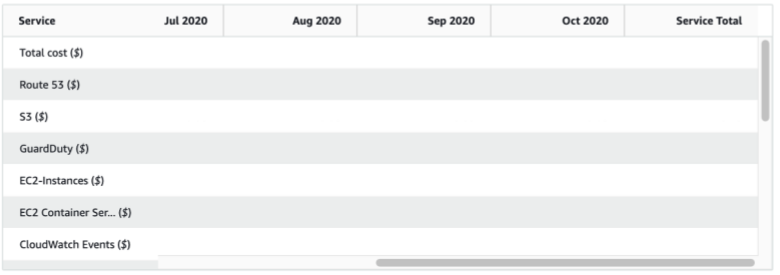
- In “Advanced Options” under “show costs as” select Amortized costs
- You will be able to see the approximate amount of the target AWS resources.
Additional Resources
Below are some useful resources for troubleshooting any issue that you might experience during the tagging procedure for MAP:
Tag
CUR
- Setting up an Amazon S3 bucket for Cost and Usage Report
- Creating Cost and Usage Reports
- Managing your Cost and Usage Reports
- Cost Allocation Tags
- Viewing your Cost and Usage Reports details
- Querying Cost and Usage Report using Amazon Athena
MAP
ARN
- Amazon Resource Names (ARNs)
- Working with Amazon Resource Names (ARNs) in Amazon RDS - Getting an existing ARN
- Amazon Resource Names (ARNs) for Amazon EC2
Frequently Asked Questions
-
What does CUR-Server-Ids Automator script do?
The script does two things: it first create and configure CUR and it then generated a Server ID that customers need to use to tag their migrated workload.
-
Which AWS account customers should use to log into and execute Step 1 - Set up CUR & Generate Server ID?
If customers decide to follow the automated approached then they must run the script in the management (payer) account. If they decide to use the manual steps then they must create CUR in the management account, and they can generate the Server ID in the management account or any another member (linked) account in the same AWS Organization.
-
Should migrations occur under the same management (payer) account?
All accounts to which migrations happen must be linked to the management (payer) account where the Cost and Usage Report (CUR) is enabled
-
The documentation states that an MPE number is required. Where do I find that number?
We need the MPE number identified on your Migration Plan to be part of the Step 1 - Set up CUR & Generate Server ID. This is to facilitate multiple Migration Plans per customer and per account. You can find this number when it is sent to you for acceptance by your account team.
MPEis case sensitive and must be upper case. -
Once I finish Step 1 - Set up CUR & Generate Server Id, how do I get the ServerID information?
There are two ways to get the information:
- Browse Migration Hub and get the unique Server ID.
- Browse to CloudFormation and check the outputs for the cloudformation created during Step 1 - Setup CUR & Generate Server ID
-
How do I tag my migrated resources in AWS with map-migrated tag?
There are several ways to tag resources in AWS. It can be as simple as going to each resource in AWS console and create tags or you can write custom scripts to bulk tag your resources during or after the creation.
-
I’ve already onboarded to MAP 2.0 and have been following the tagging process that required a Server ID for each source server. How should I proceed going forward?
If you are already tagging migrated resources using a Server ID for each source server, you can continue to do so as that process will still be supported. Alternatively, you now have the option to simplify tagging for future migrations by selecting 1 (one/any) Server ID from Migration Hub to tag all migrated resources going forward.
Please note that deletion of previously generated tags is not necessary or recommended. If you decide to delete previous Migration Hub imports, it will invalidate the existing Server ID values in the tagged migrated resources and impact spend tracking for credits. If a resource has been tagged with a Server ID that has been deleted, the resource will need to be re-tagged with a valid active Migration Hub Server ID.
It is not recommended to re-tag previous existing resources that already have map-migrated tag key and a Server Id value. For newly created resources is acceptable if you prefer to use a single Server ID.
-
Does this script generate multiple Server IDs for customers who have multiple MPEs under the same management (payer) account?
Currently, this solution generates a Server ID only for the first MPE. For customers who have subsequent MPEs they can use this solution to generate Server ID for the first MPE and then follow the manual steps to generate Server IDs for the other MPEs.
-
What is the process for baseline AWS services that cannot be tagged but may also be included in MAP (which can include VMare Cloud on AWS, Amazon Connect or AWS Managed Services)?
For Amazon Connect, VMware Cloud on AWS, and AWS Managed Services (AMS) this is an automated process.
-
I’m planning to migrate only non-taggable services (Amazon Connect, AWS Managed Services (AMS), VMwareCloudonAWS). Do I still need to set up CUR?
Yes, the management (payer) account listed in the MAP agreement must always be configured using the MAP-specific Cost & Usage Report as per Step 1 - Set up CUR & Generate Server Id.
-
If I tag an existing AWS resource, will I receive MAP Credits?
The Program Terms clearly state that only MAP resources that are launched after the agreement acceptance date are eligible for MAP Credits.
-
Can I use an Amazon S3 bucket that existed before the MAP agreement as destination for my migration? You are recommended to use new S3 buckets for migration workloads. If for any reason you have to use existing S3 buckets for migration workloads, you need to provide to your account team the ARNs for each of the existing S3 buckets to be used for migration and each bucket’s current baseline spend, so that information is included in the MAP agreement. You will then need to tag these buckets during migration. Please follow this instruction on how to baseline the existing S3 buckets.
-
Which services are in scope for MAP?
You can find all eligible services for MAP in the Included Services list. Certain Specialized Services may also be included in your Migration Plan or MAP Migration Tracking and Incentive Guide. Eligible services for MAP for SAP are provided in the MAP for SAP Migration Tracking and Incentive Guide.
-
What is the cost of running Step 1 - Set up CUR & Generate Server ID
Step 1 - Set up CUR & Generate Server ID will use S3 to store CUR and the uploaded inventory respectively. These files are typically small (a few KBs) and it will take time before they start incurring charges. Check Amazon S3 pricing for details. Step 1 - Set up CUR & Generate Server Id - AUTOMATED will use a Lambda function for a time (a few seconds) that’s short enough to not incur charges on customers’ accounts (Lambda free tier). Check AWS Lambda Pricing for details.
-
I need more details about the permissions required to implement Step 1 - Set up CUR & Generate Server ID in the my AWS account. Where do I find more details about that?
- Minimum IAM permissions policy required by Step 1 - Set up CUR & Generate Server IDhere
-
Are tags case sensitive?
Yes. AWS custom tags are case sensitive. For MAP, all the tag keys used are lower case and should be adhered to.
-
Can I use Amazon EC2 Dedicated Hosts as part of MAP 2.0?
Yes. It is possible to use Amazon EC2 Dedicated Hosts as part of MAP 2.0.
-
Do I have to launch my resources in the same AWS region as Migration Hub?
You can launch your resources in any AWS region as per your convenience. Although Migration Hub is available in selected regions, there is no requirement that your resources need to be launched in the same region.
-
Do I have to launch my resources in the same region as CUR and the S3 bucket used by CUR?
You can launch your resources in any AWS region as per your convenience. CUR is an account level configuration, so by following the steps defined in Step 1 - Set up CUR & Generate Server Id should be sufficient.
-
I don’t see map-migrated tag in the Cost allocation tags screen. What should I do?
The map-migrated tag should must be used in at least 1 AWS resource before it is available in the Cost allocation tags screen. We recommend tagging the S3 bucket used for the CUR daily report generation with map-migrated and map-migrated-app. The Step 1 - Set up CUR & Generate Server Id - Automated scripts will tag the mentioned S3 buckets automatically. After the S3 bucket is tagged, it might take up to 24 hours for the map-migrated tag to be available at the Cost allocation screen.
-
Can I have multiple CUR setup in my management (payer) account? Yes. You can configure multiple CUR in the management (payer) account for different business reasons. However, only 1 (one) CUR with the prefix map-migrated should exist in the management (payer) account. Having multiple CUR with prefix map-migrated will impact the credit calculation.
-
How can I see the MAP credits that have been applied to my account?
The MAP credits information will be listed in your invoice and CUR report with the following description:
PromotionName - SLS_MAP5k_xxxxxxxxx_CustomerName_MPExxxxx Promotion Description - Migration_Acceleration_Program_Credit

You can use AWS billing console to track MAP 2.0 related credits (used and remaining). In order to do so, you can go to the billing console, and see MAP 2.0 credit line items under ‘credits’.
AWS Migration Acceleration Program - tagging instruction guide
Categories
Tags